Rinjani Trekking Map: A Comprehensive Guide for Adventurers

Mount Rinjani, the second-highest volcano in Indonesia, has long attracted trekkers, geographers, and nature lovers who wish to experience its breathtaking beauty and challenging trails. Rising to 3,726 meters above sea level, this mountain is not just a natural landmark; it is also a cultural and ecological treasure of Lombok. For those who plan to climb it, a trekking map is more than a convenience—it is an essential tool for preparation, safety, and a deeper understanding of the journey ahead.
This article explores the significance of the Rinjani trekking map, its detailed features, the primary climbing routes, and practical guidance on how to make the most of it. Whether you are a university graduate with a passion for exploration or a professional seeking a well-organized adventure, this guide will provide you with the insights you need.
The Importance of Using a Trekking Map
While enthusiasm and physical fitness are critical for any trek, knowledge is the key to making the journey safer and more rewarding. Here is where the importance of using a trekking map becomes evident. Rinjani’s trails are not simple hiking paths; they are rugged, steep, and sometimes unpredictable. Weather conditions can shift rapidly, turning a clear morning into an afternoon of heavy fog or rain.
A trekking map provides a structured understanding of the terrain: elevations, resting points, water sources, and camping areas. It allows trekkers to anticipate challenges before encountering them and to calculate time and energy expenditure with more accuracy. Unlike relying solely on a guide or group leader, using a map encourages personal responsibility and self-reliance, qualities that enrich the trekking experience.
Maps also serve as cultural and ecological guides. They often highlight sacred sites revered by local communities, as well as zones designated for conservation. Being aware of these details fosters respect for the land and its people, reminding trekkers that climbing Rinjani is not only about reaching the summit but also about engaging with a landscape that carries historical and spiritual meaning.
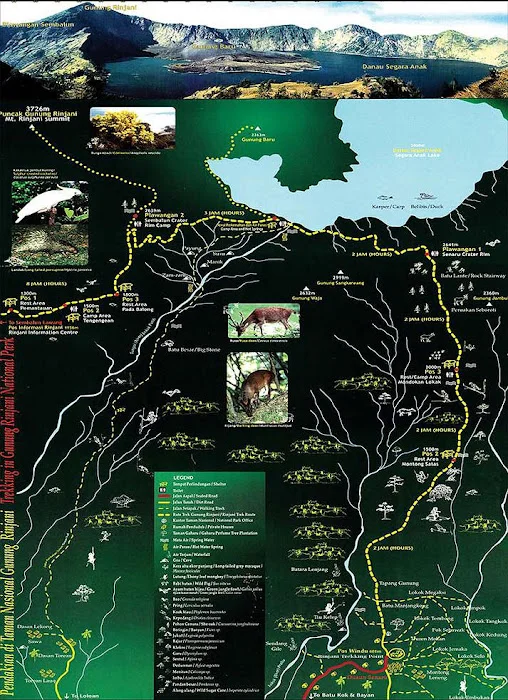
The Main Climbing Route on Mount Rinjani
When planning an ascent, trekkers often ask which route is most suitable. In practice, there are three main gateways to Rinjani: Senaru, Sembalun, and Torean. Each offers distinct landscapes and challenges, and a comprehensive Rinjani trekking map will clearly illustrate these paths.
Senaru Route
Traditionally regarded as the classic starting point, the Senaru trail leads through dense tropical forests filled with bird calls and occasional monkey sightings. This route is often chosen for treks to the crater rim, where stunning views of Segara Anak unfold.Sembalun Route
The Sembalun path begins in wide, grassy savannahs before climbing steeply toward the summit. This route is typically used for summit attempts because of its gradual initial incline, which conserves energy for the challenging final ascent.Torean Route
A relatively newer path gaining popularity, Torean offers a mix of river valleys, waterfalls, and gentler descents. Many trekkers prefer this route for descending after reaching the crater or summit, as it combines beauty with practicality.
Each of these routes connects to key camping sites such as Plawangan Senaru Crater Rim, Sembalun Crater Rim, and Segara Anak Lake, all of which are clearly marked on most trekking maps. Understanding the main climbing route on Mount Rinjani is essential for planning both the pace and duration of your adventure.
Rinjani Trekking Map Details
A good trekking map of Rinjani is not a simple sketch but a detailed resource that integrates topography, landmarks, and practical notes. Some of the most important features include:
Elevation Profiles – These allow trekkers to visualize the steepness of each segment. Knowing when to expect ascents or descents helps in energy management.
Resting and Camping Sites – Locations such as Pos 1, Pos 2, and Pos 3 on the Sembalun route are marked with distances and estimated travel times.
Water Sources – Reliable water access is limited at higher altitudes, making this information crucial for hydration planning.
Hazard Areas – Maps often indicate sections prone to landslides, slippery slopes, or unstable volcanic ground.
Cultural Landmarks – Sites of religious significance, particularly around Segara Anak, are marked to remind trekkers to show respect.
Modern trekking maps may also come with GPS coordinates or digital formats compatible with mobile apps. However, even in the digital age, carrying a printed map remains essential due to limited phone signal and battery constraints in the highlands.
Tips for Reading and Using Trekking Maps
For those unfamiliar with outdoor navigation, a trekking map can seem daunting at first glance. Yet with a few practical steps, anyone can learn to use it effectively. Below are some essential tips for reading and using trekking maps:
Understand the Scale: Pay attention to how distances are represented. A kilometer on paper may translate to an hour or more of steep climbing in reality.
Use Landmarks: Identify major features such as ridges, rivers, and crater rims. Cross-checking these with your surroundings ensures you remain on track.
Combine with a Compass: While GPS devices are convenient, a compass remains reliable in conditions where electronics fail. Knowing how to align your map with a compass can prevent disorientation.
Mark Your Progress: As you pass checkpoints or camps, note your location on the map. This not only boosts confidence but also helps in emergencies.
Consult Frequently: Don’t wait until you are uncertain. Checking the map regularly makes navigation smoother and less stressful.
Mastering these tips does not require advanced cartography skills. Instead, it involves patience, observation, and the willingness to engage actively with the environment.
Important Preparations Before Trekking
No map can substitute for inadequate preparation. Before setting foot on Rinjani, trekkers should prioritize several key aspects:
Physical Conditioning – The trek involves multiple days of strenuous hiking with heavy packs. Training through regular cardio, strength exercises, and practice hikes makes the journey manageable.
Equipment – Beyond a trekking map, essential gear includes sturdy boots, weather-appropriate clothing, a sleeping bag, and basic first aid supplies. A headlamp is indispensable for early morning summit attempts.
Permits and Guides – Entry to Rinjani National Park requires a permit, often arranged through trekking organizers. Hiring local guides and porters not only enhances safety but also supports the local economy.
Nutrition and Hydration – Plan meals that provide lasting energy. Dehydration is a common risk, making water planning critical.
Mental Preparedness – Long treks test patience and determination. Being mentally ready for discomfort, cold nights, and unexpected obstacles is as important as physical fitness.
These important preparations before trekking are what transform the journey from a risky gamble into a meaningful adventure.
Why the Rinjani Trekking Map Matters in the Bigger Picture
Beyond individual convenience, trekking maps play a broader role in sustainable tourism. By guiding trekkers along designated paths, maps help reduce environmental degradation caused by off-trail walking. They also highlight zones that require extra caution, minimizing accidents and reducing the burden on rescue teams.
Moreover, maps represent a bridge between local knowledge and global exploration. Many of the details that appear on trekking maps—such as rest points and water locations—are informed by generations of local experience. In this way, maps embody a fusion of traditional wisdom and modern cartographic methods.
For more information about trekking Mount Rinjani, please contact us directly via WhatsApp +62 87743047854